Hey there! I’ve gotten a whole bunch of new followers since I started showing off gameplay, so I wanted to handle this update a little differently. I asked on Twitter if you had any questions in regards to Arbiter’s combat/animations, and the response was overwhelming! I don’t know if I’ll be able to cover everything here, but I’ll do my best.
I also made a short FAQ page recently, so if I skip your question in this update, it may be because it’s already been answered in there! I’ll be updating the FAQ pretty regularly to cover any common questions, so please check it out before asking (hah, like that’ll stop people).
Lastly I just want to quickly say that the positive response I’ve gotten on Twitter/Discord has been… overwhelming. Seeing all the comparisons to games like DMC, FF15, Tales, and of course, Kingdom Hearts, is extremely fulfilling. Probably the hardest part of being an indie dev is staying motivated, so stuff like this counts for more than you’d think. So thanks everyone, seriously. You all make my job worth it, and I can’t wait to share more and more of Arbiter with you as it develops!
How Arbiter’s Combat Works
 To get things started, I noticed a lot of people simply don’t know how the game works! They see Ashe going back and forth between black and white and they wonder if this is some sort of Tokyo Ghoul fan-game or something. We can’t have that, so let’s break it down.
Arbiter is a game about transformation. You play as Ashe, the new Arbiter, whose job is to seal spirits. By sealing spirits, you learn their powers. At a basic level, you can use these powers in the form of abilities, which are effectively moves you can use whenever you want. At a higher level (sealing bosses) you can straight up transform into them like a drive form in Kingdom Hearts II. I’ve broken everything down in more detail below!
Phase Shifting
 In Arbiter’s world, black and white both represent different phases of spiritual power: Ether (white) and Umbra (black). You can consider them two sides of the same coin. Phase shifting is the process of switching between those powers, giving you an advantage/disadvantage against your enemies.
The way it works is simple: you deal more damage to enemies of the opposite phase, and restore energy when attacking enemies of the same phase. This effectively means that to maximize damage output, you switch to the opposite colour of the enemy; to get some energy back (which is basically mana), you switch to the same colour. I call this the Counter Colour system (because who doesn’t love a good alliteration).
 You can currently see this mechanic in play when Ashe attacks an enemy. Same-phase attacks will steal energy, having trails of it flow from the enemy into Ashe. Opposite-phase attacks will deal more damage, having a more aggressive and impactful hitspark. I’ll also be doing some simple things on the HUD to make it clear what your current “phase matchup” is, so you always know what results you’re going to get.
This system feeds into pretty much every single mechanic in the game. The type of your attacks, the damage you receive, the way you can interact with certain environments—all of it is affected by your phase. You can switch whenever you want with the press of a button, so mastering how and when to use this mechanic will be crucial. Alternatively, you can use it to put yourself at an intentional disadvantage to make the game harder. Whatever floats your boat!
Basic Combat
Core combat is split between light and heavy attacks, performed with the Left/Right mouse buttons respectively (and X/Y on controllers). Light attacks are pretty much your standard Kingdom Hearts II combo. I’ve always loved the way Sora sticks to his enemies and smoothly transitions between ground and air combat, so I wanted to emulate those systems in Arbiter (with my own spin of course). Heavy attacks are something of a style button like in DMC, that change drastically based on Ashe’s current transformation. Both of these attacks will have the phase properties of dealing more damage/restoring energy. For base Ashe, heavy attacks are a simple launcher on the ground and a spinning slam in the air.
Additionally, I have a lot of contextual attacks that change based on your positioning. Ashe will automatically dash towards enemies that are far away, and he’ll rise up to airborne enemies when he’s on the ground. The game’s far from being “mash x to win”, but I wanted to make sure people didn’t struggle sticking onto their enemies outside of ability usage. These will all be toggleable of course, and I’m also planning to have unique contextual attacks based on the transformation Ashe is using!
Sealing
Sealing is an execution mechanic that finishes off low-health enemies to seal their souls. In order to learn an enemy’s abilities, you must seal them (sometimes multiple times). The actual process of sealing is contextual, but will usually have Ashe dashing towards his target and thrusting his palm into their chest before ripping it out, taking their soul with it. In some cases, he may just thrust his palm in midair and pull their soul from a distance. The different sealing animations change based on context, so ground, air, distance, and more are all factors in deciding how Ashe will seal his enemies.
Sealing can be considered a combination of several different mechanics. V’s Finishers from DMC5 are probably the closest, as well as reaction commands from Kingdom Hearts II, and Zandatsu Finishers from Metal Gear Rising. I’m planning to have tons of different sealing animations for Ashe in order to keep gameplay refreshing and fluent, with unique finishers for bosses.
Sealing is not required to kill enemies, however, and there will be a small window before an enemy is defeated during which Ashe can seal them. Additionally, the phasing mechanic will also apply to sealing, though with a bit of a different spin. Sealing enemies of the same phase will restore a large amount of energy, while sealing enemies of the opposite phase will restore health instead. Since the game is largely focused on mob battles, you’ll have to think carefully about how you want to seal each enemy in regards to positioning and resource management.
Transformations
As I mentioned earlier, transformations are learned from sealing bosses. These are full moveset changes that cost energy to maintain, but will completely alter your light and heavy attacks similar to drive forms in Kingdom Hearts II. Light attacks will almost always be a combo with unique contextual attacks, but heavy attacks will vary greatly between each form. I haven’t started on the forms yet, but switching between them will be as simple as switching weapons in DMC. Rather than being weapons themselves however, you can consider them more Ashe “fusing” with the boss he’s harnessing. So not only will he get a new weapon, but his appearance will noticeably change based on the form.
Abilities
Abilities are unique moves you learn from sealing regular enemies. You can equip 4 abilities to each phase (4 on black; 4 on white), allowing you to customize how you want both phases to play. You can use them simply by pressing the 1-4 Keys on keyboard/mouse or Right Trigger + AXYB on a controller. Unlike light/heavy attacks, abilities cost energy to perform, and do not restore energy on same-phase enemies, the trade-off being that abilities are much more powerful and can be strung together freely to create combos.
They aren’t just for combos however. They can range from anything between projectiles, to attacks, to defensive moves, healing, etc. There will probably be some abilities in the game you never touch, and others you swear by. The goal is to make a slew of fun moves you can customize to truly define your playstyle. Some may be more effective against certain bosses, some may be great for crowd control, some may just be fun to use—how you want to use them is entirely up to you. Additionally, some abilities will change based on the transformation you’re using, but you’ll have to discover those for yourself.
I plan to have about ~30 abilities in the game total (one for each sealable enemy). About half are implemented right now so I expect to be done with all of them by the end of July!
Technical Breakdown
I’ve gotten a bunch of different questions about the systems that make up the gameplay, but most seem to boil down to: how does the game look so fluid/smooth. That’s kind of tough to explain, as it’s more an internal, subjective sense of what feels good to me and how I’ve curated that feeling over the years, but I’ll do my best to explain how I got there.
References
To quickly start, I spend a lot of time studying animations in games/anime frame by frame. This is kind of the basis for my education as an animator, as I didn’t go to College/University or anything like that. As boring as it seems, study and practice is a really great place to start when you’re looking to improve, so just focus on seeing why it is you like the things that you like and then taking those lessons and fueling them into your work. I know this advice is nothing groundbreaking, but that’s pretty much been my process at getting better over the years. Practice never lies!
Animation
I’m not a great animator by any means—I’d say I’m about average at best. That said, I know how to hide my faults as an animator with things like VFX and camera movements and procedural animation. For me the animation mostly just defines the flow of motion and timing of each attack before I go polishing things up. I do all of my animations in 3ds Max using the CAT rigging system.
Ashe moves very quickly, and almost always keeps his sealing hand free so he can seal spirits at a moment’s notice. This effectively means that he needs momentum and power with one handed strikes, which we can do pretty easily with Spinning™!
Ashe spins a lot in the game, with the goal being to make his combat look like he’s somewhere between dancing and conducting an orchestra (a really aggressive orchestra apparently). On top of that, it has to look cool, since that’s what his naive teenage brain thinks the Arbiter should be. With that in mind, let’s take a look at the Whirlwind ability, which I feel conveys all of that pretty accurately.
Movement
For moving the character, I don’t use any root motion. I usually script things like gravity and specific movements by hand, but for just moving the character I’ll use my own custom root motion solution driven by Animation Curves. These are simple XYZ values driven by Unity’s built-in animation curve system that I interpret in my character controller simply as “move in this direction by this amount”. I use Unity’s default Character Controller component for this, as I don’t like how Rigidbodies move by forces (hard to control), and I’m too lazy/uneducated to write my own system.
If we break the curves down, you can see that he first pulls back a little bit, then dashes forward before coming to a stop, and moves forward a little bit at the end as he steps back into place. I find iterating in the editor directly like this is much more efficient than tweaking animations for proper root motion or scripting everything by hand, but do whatever works best for you!
Floatiness
To get the floaty feeling, I do a lot of gravity manipulation and smoothing to make things feel nice and fluent. For example, during an air attack I may just straight up set Ashe’s gravity to zero so he’s not being pulled down at all. I may also have him sync his altitude with the enemy’s to make sure they’re at the same height while in the air. I know one thing that’s criticized (as was for Kingdom Hearts in particular) is feeling too floaty, so I generally try to only make recovery frames floaty, which can all be cancelled by jumping/dodging/using other abilities/etc. Additionally for worst case scenarios, there’s the drop mechanic, which essentially makes any lingering floatiness a non-issue.
Implementation
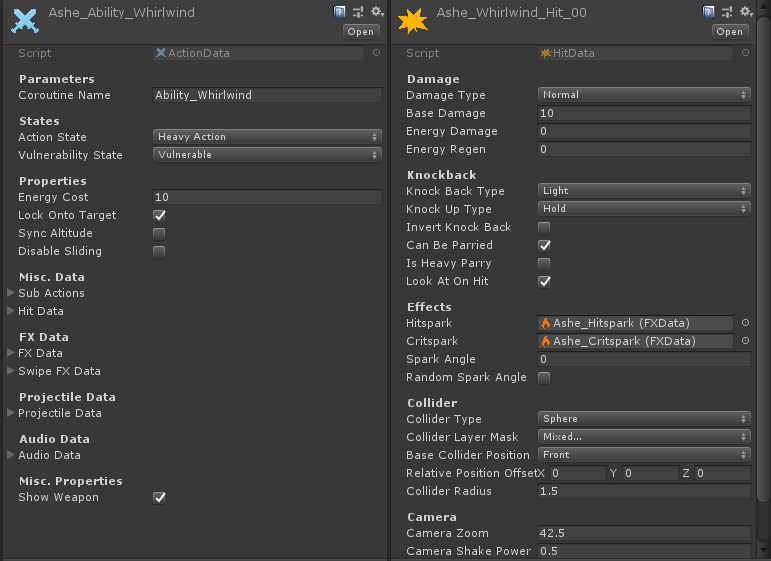 At this point I start on early implementation of the attack, setting up boring stuff like “can this attack be cancelled, how long does it last, when does it hit,” etc, etc. I use a data driven system using Scriptable Objects to streamline this process, though I’ll regularly tweak things in script too (instantiating effects, moving to a specific position, etc.). All this stuff is segmented in code using coroutines and yields.
For hit detection I simply use a Physics.OverlapSphere (or Capsule/Box) to detect all enemies in the intended range, and I call it with a simple CheckHit() method when I want the attack to hit. I prefer this method over triggers as it’s much more predictable and informative, even if it means the collision is all handled through script.
Anyways, here’s a look at how I split my data up: the left shows the ActionData that defines how the coroutine works, and the right is the HitData that defines how the attack actually hits.
VFX
 The last step is making the VFX! This stuff mostly just comes down to particle systems, camera shake/zoom, and physics. For the latter, I use a tool called DynamicBone which handles bone physics pretty easily. I use my own scripted camera for now, but I’m planning to check out Unity’s CineMachine system to see if it’s worth switching to. Particles are the big one though, so let’s get to it.
I make all of my shaders using a tool called Amplify Shader Editor, which is an extremely powerful and intuitive visual shader editor. My shaders aren’t terribly different from Unity’s standard particle shaders (Blended, Additive, Multiply), but the key thing I do differently is use a method called Alpha Erosion. This effectively means you subtract the alpha away rather than multiplying it, which erodes the particle’s opacity over time.
Other than that, I just use lots of bloom, distortion, dissolves, and good timing to make the VFX pop as much as I can. RealTimeVFX is a great resource for learning more about how to make good looking VFX, as you’d learn more in a few minutes over there than anything I could explain here. The community is also very responsive and make tons of great tutorials/cheat sheets, so check it out! You can also check out the lovely ErbGameArt who makes a ton of really awesome VFX tutorials too!
These are a few of the effects in the game! If you’re wondering whether I have to make a light/dark variant for every single energy effect, the answer is poor life choices.


Finalizing
When you put all these components together, you get an ability! Some may require more attention than others, but the fundamentals are largely the same across the board. That said, I will often spend hours and hours polishing things up, usually on the animation side. Sometimes even the best VFX won’t make an ability look good, so I need to go back and bring the animation quality up to the best of my ability (or toss it all and restart from scratch). As I said earlier, animation is kinda the backbone for the game’s feel, so it’s important to me to get that right first (and the motion curves) before worrying about VFX.
When you’re all done, you get something like this! To break this one down, I have Ashe playing the spinning animation I made earlier. Then we have him moving forward with the animation curves defined in Unity’s Animation Importer. Then we have the scripted parts of him actually hitting the enemy (which gets knocked back twice and then slammed into the ground). Then we have the effects of several dissolving clones being created with BakeMesh(), the sword trail (using X-WeaponTrail), the hitsparks being created on the enemy itself, Ashe glowing briefly as he pulls back his sword, and the slashing effect that comes with the final strike.
Whew! There’s a lot of individual components that go into making each ability feel good (and this is one of the simpler ones), but it’s worth it once it all comes together. This one’s not quite done, as I still intend to add dust impacts and change the slashing effect a bit, but it still feels pretty good!
Conclusion
And that’s a wrap! I apologize for the novel (especially since I still didn’t cover everyone’s questions), but hopefully it serves as a good baseline for any fellow devs out there. As always these are only how I choose to approach things as a solo developer, so I suggest finding your own methods that work best for you. This is simply the workflow I’ve developed over the years to make things quickly while looking somewhat decent.
If you have any more questions or anything, feel free to hit me up on Twitter or come hang out in the Arbiter Discord! I talk about this stuff much more regularly in the latter, and there’s plenty of other developers in there too that can offer their two cents.
Anyways, thanks again everyone and I’ll see you next time!